As we talk about in our post about Jacques Rolling Wheels DIY, we had a lot of little projects, repairs, and upgrades we wanted to do to Tad Cooper to make him just a little bit better!
This post may contain affiliate links, meaning if you click on it and make a purchase I’ll receive a small commission at no cost to you. As an Amazon Associate, I earn from qualifying purchases. For more information, please check our Privacy Policy and Disclaimers and Disclosures.
The Door

One of the first things we took care of was removing the broken glass panel and having a new one cut for us by Crow Paint and Glass in Lebanon Mo. Their price was really reasonable, and their turnaround was a little long, but so has everyone’s been in this post covid world. Taking the door apart was just a matter of unbolting the various components. Adult LEGO. Putting the new glass in was a bit of a challenge until I remembered the silicon grease I had from another project. A little dab and the rubber gasket slid right into the channel.
New Steps!


One of Mom’s big wishlist items was cutting out the front steps and installing additional storage under them. This is a pretty common skoolie upgrade, though takes a bit of doing, depending on how one’s bus is built. We had to use a diamond cutoff wheel to cut off the ‘caps’ as the metal was so thick and tough. We did the back cuts first and riveted in the hinge before cutting the sides and front to ensure the alignment was perfect. After that we fabricated an aluminum frame for the wooden boxes, making one smaller box on top for dad’s tools, and a larger one below for shoes. Speaking of shoes.

This is probably the 3rd iteration of this idea. Originally we had planned to have these attached with magnets to the outside of the bus and people would remove their shoes before coming in.
This was sub-optimal. The magnet would slide down the side of the bus and needed a rubber mat. Even then, the bracket they came with started to break down. Most decisive was everyone was coming inside, removing their shoes, then going back out to hang them up.

After a little experimentation with hanging options, we finally got it right (for now) and are working on getting in the habit of hanging our sandals when we take them off. Shoes go right into their cubby.
Bathroom Remedies Storage

Back before launch, Mom was a big proponent of home remedies and herbal cures. Well, she still is. We have tons of “potions, lotions, and salves” as I like to say, but for a while after launch, we weren’t using them. While we love all the cabinets in the bus, it makes it easy to pack and forget. We got a bunch of these baskets, and some smaller ones, too.
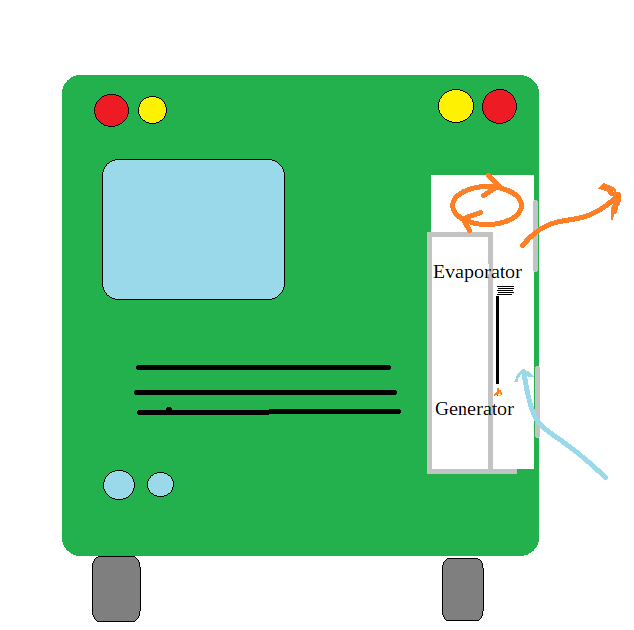
Refrigerator updates!
Our fridge is a 3-in-one unit, meaning it can cool with DC power, AC power, or propane. These work by heating a column of ammonia and water until it vaporizes in the generator on the diagram. The vapors then interact with hydrogen gas to pull heat from inside the refrigerator into the evaporator. These units are very efficient if ambient temperatures are below 80, but when the temps are high, or we’ve parked with the driver’s side facing south, the fridge can struggle.
Our fridge was designed to have a vent on the roof of the vehicle to help the heat escape, but our builder needed all the space for solar and just did two side vents.

Most of the time it’s fine, but when it gets hot, too much heat gets trapped and the fridge doesn’t work.
We were able to order this automatic vent fan from Amazon.

The thermocouple allowed us to program it so it only runs when needed. We haven’t had a cooling issue since!
Painting!
Our bus was painted a beautiful shade of hunter green, but every storage bay and locker was as bright as the sun white. We were lucky to find a near-perfect match spray paint and were able to paint all the bay and most of the hatches to match.


Other Upgrades
- Added magnetic solar lights around the bus for rodent repellant.
- Added a secondary propane pigtail to use a 5lb auxiliary propane tank when needed.
- Added a deadbolt and barrel lock to the house door to keep The Dog in.
Planned Upgrades
When we get the time or money, there are several updates we’d like to add to Tad Cooper.
- Add an auxiliary generator to keep the batteries topped up when the sun doesn’t shine.
- Add a tire pressure monitoring system to the bus and toad for peace of mind and safety.
- Add an air compressor system for topping up tires, and maybe running tools.
Stay tuned!